Growing Corner

Planting instructions Kiwi

Planting Instructions

We want your plantings to thrive. Be sure to visit our planting instructions page for a step-by-step guide and the proven tips and tricks to help ensure your success.

Growing Edibles

As the desire for sustainability and self-sufficiency continues to grow, Kiwi Nurseries Ltd. recognizes the importance of providing the prairie hardy trees, shrubs and perennials that are necessary in creating edible landscapes for our area.
  • Plant Problems
Kiwi Nurseries Ltd. has years of experience in identifying and troubleshooting common diseases and issues that we face in our climate. To help ensure the success of our customer’s projects we want to share that knowledge with you. Under each title below you will find information to help you identify and treat the following common plant problems. If you still have concerns about an issue with your plant, we welcome all of our customers to contact us with any further questions.

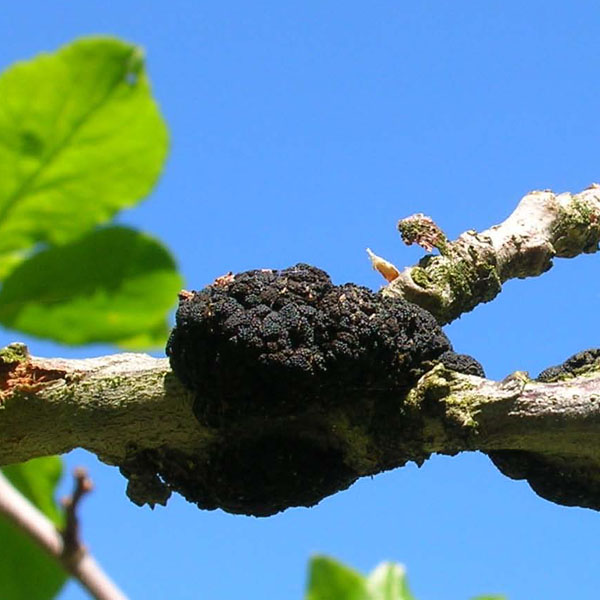
Printable PDF: Black Knot Handout
What is Black Knot?
Black Knot is a fungus (apiosporina morbosa) which is characterized by its black, tar-like lumpy growths affecting the Prunus family, such as Cherry, Plum, Apricot, Chokecherry, and Mayday trees. It is an airborne fungus which overwinters in the knots, then releases spores in the early spring of the infection’s second season, typically during rain. The spores are distributed long distances on wind currents and through rain splashing. Black Knot typically affects new green twigs, but can also affect mature branches or trunks, especially if physical damage is present. If left un-checked, these black galls will continue to grow and will eventually girdle the branch or trunk and kill it. The stress caused to the tree can also make it susceptible to other diseases and can affect the overall health of the tree. Black Knot is highly contagious.

Symptoms
Stage 1 : The branch will turn light brown and start swelling. These swellings can be difficult to notice.

Stage 2 : The swelling will continue to grow. As it matures, it will turn into visible hard, black galls.

Stage 3 : As the galls continue to grow internally and externally, it can eventually kill the branch and tree.

How to Manage Black Knot
All infected branches must be pruned out of the tree at least one foot from the infection site. To prevent the spread of further infection, disinfect the pruners with bleach between each cut. When removing the cut-off branches, be careful not to rub them against healthy branches. Immediately place infected branches into a garbage bag.

Diseased wood must be eliminated immediately, by burning it or putting the closed bag of infected branches in the garbage. Monitor regularly to make sure it does not come back. If you spot black knot in your neighbour’s tree, then your tree has a greater chance of becoming infected.

What is Fire Blight?
Fire Blight is a contagious disease caused by the spreading of the pathogen Erwinia amylovore, a bacterium affecting apples, pears, and some other members of the family Rosaceae. Honeybees and other insects, birds, rain and wind can transmit the bacterium to susceptible plant tissue. Injured tissue is highly susceptible to infection, including punctures and tears caused by plant-sucking or biting insects. Once deposited, the bacterium enters the plant through open stomata and causes blackened, necrotic lesions, which may also ooze a viscous fluid, especially in humid weather. The disease spreads most quickly during hot, wet weather and is dormant in the winter when temperatures drop. Infected plant tissue contains viable bacteria and can return upon warm weather in the following year.

Symptoms
Symptoms may appear on blossoms, fruits, shoots, or branches of an affected tree. All symptoms are above ground and are typically easy to recognize. Symptoms on blossoms result in a dull, gray-green appearance and eventually tissues will shrivel and turn black. The base of the blossom and young fruit show similar symptoms as infection spreads. Shoots can show similar symptoms but develop much more rapidly. A “Shepherd’s Crook” can be seen when the tip of the shoot wilts, and diseased shoot leaves typically have blackening along the mid-vein and then die. Initial infection of blossoms and shoots can spread to larger tree limbs. Branches will darken and become water soaked. Advanced infection develops cracks in bark and a sunken surface. Wood under the bark will become streaked with black discoloration. Immature fruit forms water-soaked lesions and later turned black. Bacterial ooze can be found on these lesions. Severe infections result in fruit turning entirely black and shriveling.

How to Manage Fire Blight
All infected branches must be pruned out of the tree at least one foot from the infection site. To prevent the spread of further infection, disinfect the pruners with bleach between each cut. When removing the cut-off branches, be careful not to rub them against healthy branches. Immediately place infected branches into a garbage bag.

Diseased wood must be eliminated immediately, by burning it or putting the closed bag of infected branches in the garbage. Monitor regularly to make sure it does not come back. If you spot Fire Blight in your neighbour’s tree, then your tree has a greater chance of becoming infected.

What is a White Pine Weevil?
The white pine weevil is a pest that causes extensive damage to many types of evergreen trees. it is also known as the Engelmann spruce weevil and the Sitka spruce weevil. This harmful pest attacks at least 20 different species of trees. it prefers Easter White, Jack, Scots pine and spruce trees.

Symptoms
Droplets of resin oozing from tiny feeding holes in the leader stem early in spring. These can be hard to notice. A shepherd’s crook in the leader is a classic sign that an evergreen is infested with the white pine weevil, although other pest attacks may result in similar symptoms. The curling and death of the leader of a tree indicates the presence of larvae in the stem. THe needles on the affected stem will turn yellowish-green, then reddish-brown and will eventually fall off. The damage generally appears in mid-June or early July.

How to Manage White Pine Weevil
Pruning infested trees can be an effective control if its done as soon as possible after the first signs of infestation are noticed. you must prine out infested branches. Prune close to the topmost unaffected whorl of branches.

Infested wood must be eliminated immediately, by burning it or putting the closed bag of infested branches in the garbage. Monitor regularly to make sure it does not come back. If your neighbour’s tree is infested, then your tree has a greater chance of becoming infested.

What is a Yellow Headed Spruce Sawfly?
The yellow headed spruce sawfly is a pest that causes extensive damage to many types of evergreens, mainly spruce trees. Their eggs are pearly-white and ovate. The larva causes the damage to the trees. The yellow headed spruce sawfly prefers young open trees.

Symptoms
Once the eggs hatch, the larvae eat small parts of the new needles. As they develop they will strip the needles from the branch and go after older needles. There will be multiple sawfly larvae on each tree.

By July infested trees appear ragged and yellow- brown near the top. Heavily-infested trees may be completely stripped of foliage. If not treated for a few years, the sawfly can kill the tree. Sawfly is infectious!

How to Manage Yellow Headed Spruce Sawfly
If the sawflies are only on a few small trees, they can be controlled by picking off and destroying the larvae when they are first noticed. For shelterbelts or large trees, chemical control is needed.

The following insecticides can be used; acephate, carbaryl, diazinon, dimethoate, malathion or permethrin. Insecticide application should be made when damage is first noted.

Trees can recover from sawfly provided they do not become re-infested. It may take several years to fully recover.

Leaf roller 1
What are Leaf Rollers?
Leaf rollers include a few different species of butterflies and moths. The larvae shelter themselves by rolling up leaves around their bodies in a cylinder, with a silk plugging the ends.

How to Manage Leaf Rollers
The damage they cause is primarily aesthetic, with the disfigured leaves often noticeable if found near eye level. The tree is not usually harmed, as they are not voracious eaters. The leaves or branches can be pruned to get rid of heavily impacted areas of the tree. There is not a reliable chemical control, as the larvae are well protected in their shelters.

What is Sunscald?
As much as we love the beautiful sunny winter weather, some plants such as evergreens can be susceptible to sunscald if not properly protected. Sunscald can occur if snow near the base of an evergreen is left untouched. The smooth, white surface of snow can act like a mirror reflecting the sun’s harsh rays onto nearby evergreens causing damage to the foliage.

How to Prevent Sunscald
In order to protect them, tromp down the snow around the base of these plants. This makes the surface of the snow uneven, allowing the sun to reflect in different directions, minimizing the concentration of the harsh rays.

How do Rabbits, Mice & Voles Damage Trees?
Rabbits, mice and voles are known to frequently damage the lower 2-3 feet of some trees during winter months, by chewing off the bark around the base of the trunk. When the bark is removed from a tree trunk it effectively disrupts the tree’s ability to carry energy from the leaves down to the roots. Eventually the roots starve and the tree dies.

Rabbits : With the ability to stand on their hind legs, they tend to gnaw on bark from a few inches above the ground surface to as high as two to three feet up the trunk.

Mice & Voles : These smaller vermin, on the other hand, are adept at burrowing beneath the snow and sometimes even beneath loose soil or mulch, to eat away at the tree bark without ever being noticed.

How to Prevent Winter Animal Damage to Trees
Move Your Mulch : In the fall, push your mulch back away from the base of the tree trunk by a few inches to prevent mice and voles from burrowing in unnoticed.

Wrap Your Trees : Fall is also the time to wrap the trunk of your trees with a plastic tree wrap from the base of the trunk to about three feet up the trunk.

TIP : Be sure to remove the protective wrap in the spring!

What is Fall Needle Shed?
Yellowing of interior needles in the fall is a normal occurrence for evergreen trees. Conifers do not keep their growth of needles on their inside branches and shed them naturally in the fall. The discoloration, which affects the older needles close to the trunk occurs in late August, and can continue until freeze up. The amount of shedding can be greater if the tree has been placed under stress caused by droughts, flooding or newly dug trees. These needles are not replaced and this is why evergreens are bare of needles near the trunk and there is usually a carpet of needles under the tree.
  • Store Questions

We sell plants in both pots and wire baskets.

Potted plants are typically grown in pots throughout their life, being “potted up” (transplanted from a smaller pot to a larger pot) as they grow. A special soil mixture is used to provide proper drainage, nutrients and a lighter weight pot for easier portability. Potted plants require daily monitoring for moisture content before planting. Growing trees in pots is a controlled environment where nutrients and water supply is controlled to accelerate the growth rate. As plants do not normally grow in a confined space, circulating roots may be an issue at time of planting. Potted plants may be planted at any time during the growing season. Ensure to remove all plastic pots before planting.

Wire Basket trees are grown from seedlings, whips or younger potted trees to caliper trees in the field. Once planted in the field, these trees are watered frequently until they have rooted in (one to two years). Regular pruning is required to ensure good form and weed maintenance is undertaken to provide a clean environment. Harvesting of deciduous trees can typically begin after five years in the field (species dependent). Harvesting of coniferous trees can typically begin after ten years in the field (species dependent).

Field grown trees can only be harvested in the spring or fall when the trees are not actively growing. Harvesting is done by cutting the roots of the trees with the appropriate sized tree spade and placing the tree inside a wire basket lined with burlap. The rule of thumb is 1” of caliper to 10” of roots (spade width). As these baskets are filled with topsoil they will weigh between 300-1000lb depending on the basket size and moisture content of the soil. Once trees are harvested they can be planted anytime during that growing season, by placing it directly into a hole – no need to remove the wire basket.

Check out our Planting Instructions for more information on planting.

All plants grow at different rates, even within the same cultivar, so age cannot be determined accurately based just on size. The same tree may grow 8 inches one year, and only 3 inches the next – the only way to tell the age of a tree with certainty is to cut it down and count the rings.

To maintain consistency in price and quality, we sell our trees by size, not age – based on the pot size (root ball) when they are younger, and by caliper size for deciduous trees, or height for evergreens, when they are more established.

Caliper can refer to two things in the tree world:

  1. Unit of measurement : The most common way to measure a wire basket deciduous tree is by the caliper, which is the diameter of the trunk measured 6 inches above the base of the tree. The caliper of the tree may be expressed in inches or millimetres.
  2. Measuring tool : A tree caliper is a special tool (caliper) used to measure the caliper (diameter) of a tree’s trunk.

Caliper measurements are typically used to identify the size requirements of a deciduous tree for a landscaping plan or architectural guidelines for new builds. Evergreens are measured by height.

McWay Falls is an 80-foot-tall waterfall on the coast of Big Sur in central California that flows year-round from McWay Creek in Julia Pfeiffer Burns State Park, about 37 miles south of Carmel, into the Pacific Ocean. During high tide, it is a tidefall, a waterfall that empties directly into the ocean

There are a few common reasons why you may not find the specific plant you’re looking for:

  1. We have another plant that is virtually identical.
    We do our best to have a wide range of sizes and colors of the available varieties that exist. However, we like to keep things somewhat simple in this regard and won’t bring in another variety that is virtually indistinguishable from another we already carry. If you can’t find exactly what you’re looking for, contact us – we likely have a very similar plant you could substitute.
  2. It is a new cultivar
    We pride ourselves on carrying plants that have been tested in our climate. Before introducing a new cultivar for our customers, we like to test them to see how they fare against our cold climate. If we do not stock a new cultivar, we either haven’t tested it enough to have confidence it will survive, or we have found it did not do well enough for us to sell.
  3. It doesn’t survive in our climate
    We will not sell plants that do not survive here, and we identify this based on our experience and testing, not on the labeled Zone.
  4. It is a discontinued cultivar
    There are constantly new varieties of plants being grown with better color, growth, disease resistance, drought tolerance etc. When identical-looking plants get replaced with a “better” version, the original often stops being grown. This may also happen if a specific cultivar has proven to be problematic and does not have a reasonable success rate for growers.
  • Growing & Tranplanting

You can plant perennials, shrubs and trees (whether in wire basket or pot) anytime you can dig in the soil – from early spring through to freeze-up in fall. See “When is the best time to transplant shrubs or move trees?” for planting pre-existing plant material.

It is important to check on your new plantings frequently. Topping up settled soil and staking are all maintenance items that may need to be addressed. Watering needs to be monitored regularly to ensure the plant is not over watered or dried out. Frequency of watering depends upon subgrade and soil conditions as well as the weather.

The best time to plant is when you are home to monitor your plant material, not when you are planning to leave for a weekend or vacation.

Many perennials benefit from splitting to produce the desired shape, foliage and flowering. The best time to do this depends on the specific plant but is typically best done in early spring or fall. A general rule is to never transplant when the perennial is in bloom.

Shrubs and trees should typically only be moved when dormant, in early spring or fall. However, if the shrub or tree has only been in a location for one or two growing seasons the root structure may not be fully developed so the plant may be moved throughout the summer. We recommend using an oversized tree spade when you have to transplant during the summer

This is why we only offer Tree Moving Services in very specific windows of time for different types of trees. If you are interested in moving an established tree, please contact us for more information.

Check out our Planting Instructions for step-by-step instructions on planting, including digging the hole.

This answer will vary greatly depending on the soil conditions in which you are planting. All plants benefit from nutritious soil and most plants require good drainage. The majority of plants will struggle when planted in a high-clay area. Unfortunately, most new subdivisions (the last 15+ years) have compacted clay rough grade with only a 6” top layer of soil.

If you are digging into well drained soil, we recommend digging a hole 1.5-2 times wider than the pot or root ball, leaving room to backfill around the roots with a nutritious soil or compost mix.

If you are digging into clay, we recommend digging a hole 2-2.5 times wider than the pot and creating a drainage ring around a mound of clay for the plant to sit on, then backfilling with high quality soil/compost. If you’re having a hard time picturing this, head over to our Planting Instructions.

But for any plant, a bigger hole will never hurt, so if in doubt – go bigger!

This is likely our most commonly asked question and is talked about in our Planting Instructions.

If your plant is still in the pot, it should be watered daily – even if it rains. Ensure that the pot can drain freely. Do not leave it sitting in standing water for more than 30 minutes to prevent drowning.

If it is planted, there is no magic formula for how much to water. It will vary based on the type of plant, size of plant, weather conditions, location etc. Your plant will wilt if it is too wet or too dry, so it is important to check the soil before watering.

Newly planted plants benefit from deep soaking during the first year to encourage deep root production: Turn the hose on low, place it close to the base of the plant and allow water to soak into the root area over an extended period of time (5-20 minutes, depending on size). Let the surface dry completely before watering again.

To determine your plant’s water needs, dig a hole 12” deep, just outside the root ball. If the soil is crumbly, it is time to water. If it feels wet and muddy, give your plant more time to dry out before watering again.

All plants benefit from a deep watering right before freeze-up. This creates an ice ball around the roots.

If you are unsure about watering or moisture needs, please contact the nursery.

All plants, but especially newly planted ones, will benefit from a deep watering right before freeze-up. This creates an ice ball around the roots to provide moisture when the ground thaws. This is called “watering in” and can help your plants avoid lack of water during the winter period. If there are periods of warm weather and thawing throughout the winter, we recommend giving your trees additional water to keep that ice ball built up around the roots.

Filter fabric (landscape fabric) is a common choice for controlling weeds in decorative gardens. It can be a very effective choice in rock gardens. However, we do not recommend using it under wood mulch. Wood mulch will decompose over time into a layer of soil which will end up growing weeds – above the fabric! If you do choose to use filter fabric in your rock garden, ensure it is not covering the area under the drip line of the plant. Covering the roots with filter fabric inhibits their ability to breathe and can cause the plant to become stressed. Putting filter fabric over the roots will result in voided warranty if your plant does not survive.

In most landscaping applications, mulch is a decorative and moisture retaining layer spread over the soil between the plants. It is typically made from shredded or chipped bark or wood, or more recently from rubber – often from recycled tires. In gardening applications, any sort of organic material spread around or over a plant (decaying leaves, grass clippings, compost, bark, straw etc) for the purpose of enriching or insulating the soil is considered mulch.

When planting, backfill with nutrient rich soil or high-quality compost. We recommend applying Myke to the roots or adding a root-booster fertilizer when planting – but don’t do both in the first year! Fertilizer will kill the Myke. After planting, regular, deep root watering will encourage the roots to grow down and out. For the next two growing seasons we recommend applying a root boosting fertilizer (high middle number, such as 10-52-10) to encourage further root development.

Newly planted trees focus their energy on root development to gain stability and reach the water and nutrients they need to be healthy. Giving your tree adequate water and nutrients for strong root development will establish the roots more quickly, and allow the tree to re-focus on leaves, flowers and fruit once a strong root system is in place. This may take up two to three years depending upon the size of the tree and the species.

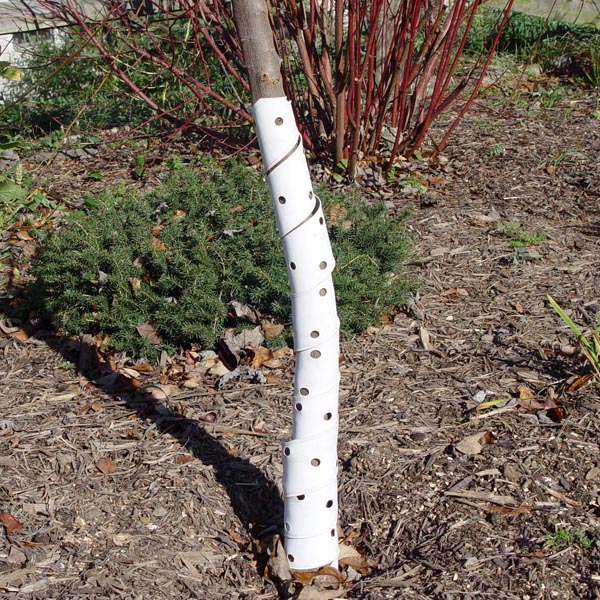
The size/height and number of stakes you need will depend on the size of tree, and how windy the location is.

Once you have the correct stake(s) for your tree and conditions, follow these steps:

  1. Drive the First Stake 1-2ft deep about 3 feet away into undisturbed soil on the windiest side of the tree.
  2. Attach the Tree to the stake using wire threaded through a rubber hose, creating a loop around the stake and tree – smaller trees may be fine with pantyhose or another soft material.
    TIP: Make sure the wire is taut, but still has some slack so the tree can still move and grow on its own. If the wire and hose are too tight, it will girdle your tree and impede growth.
  3. If Using a Second Stake, place it directly opposite the first stake. Extremely windy locations may require 3 stakes, placed in a triangle.
  4. Ensure the Tree is Straight in all directions.

Check your tree often for signs of the hose cutting into the tree, movement in the root ball, or falling over stakes. You may need to relocate or drive the stake deeper, or an adjustment to the wire may be required.

Remember, DO NOT pound any stakes into the ground within 1 metre of any buried utility line.

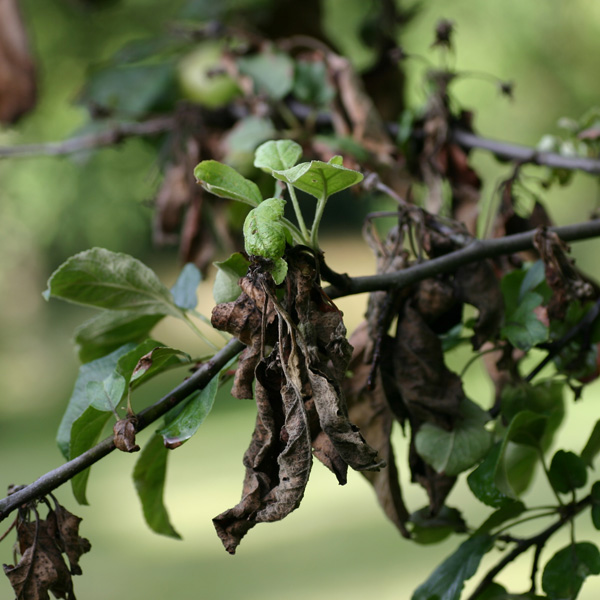
If your plant was newly planted, it may be experiencing transplant stress or transplant shock. Otherwise, for information about the most common pest and disease problems in our area, check our FAQ. If you still have concerns about your plant, please Contact Us and one of our knowledgeable staff will help.

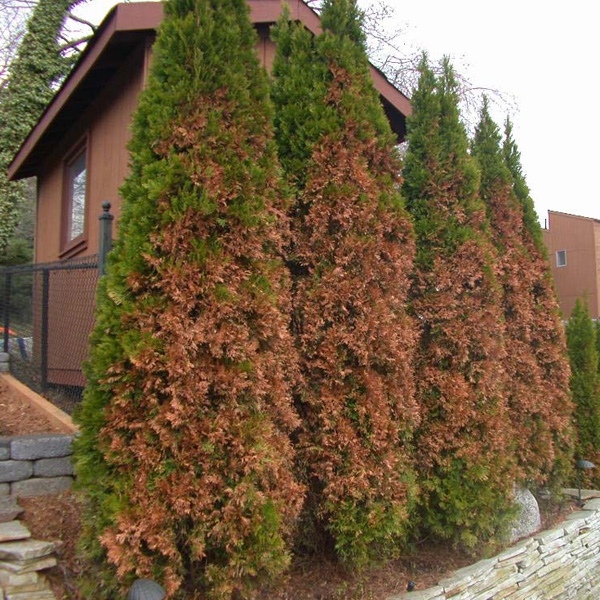
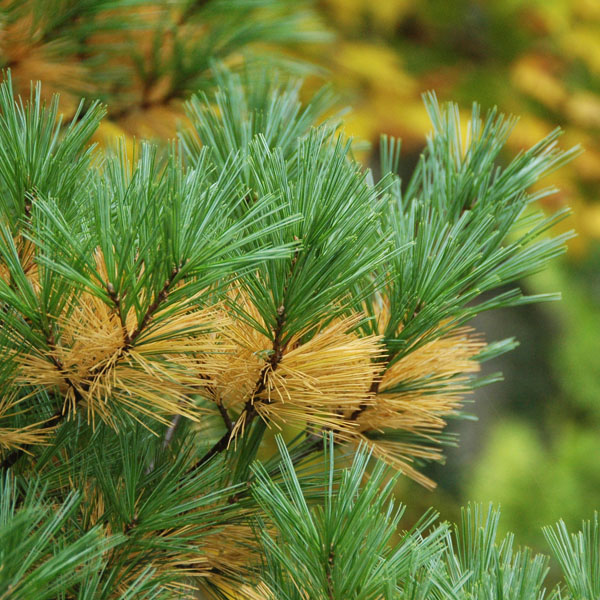
Transportation and planting can be stressful for plants and may cause transplant shock. The most common symptom of this is the leaves turning to autumn colours earlier than usual, or by dropping leaves. These are signs that your tree is feeling stressed and is focusing energy to root development or is going dormant to conserve energy.

There is rarely a need to be concerned about this – your tree is doing what it needs to, to stay strong and healthy. Keep an eye on it for the rest of the season and into spring, and make sure you’re watering adequately and providing it the nutrients it needs for strong root development.

If you are unsure what is happening to your tree please Contact Us and email us a picture.

Recent Articles

Be the first to hear about our promotions and news!

Payment Information
All prices are in Canadian (CDN) funds.

2025 © Kiwi Nurseries Ltd. | All Rights Reserved | Web services provided by Panda Rose Consulting Studios, Inc.

Hosted on Panda Cloud